
Guest Post by Fancy Flours Employee Lindsey K.
Welcome back to the third installment of our Springerle Series! This post will cover three mediums that you can use to top cookies in beautiful molded designs – modeling chocolate, fondant and marzipan. This is a super quick and easy way to take your cookies to the next level for wedding favors, birthdays, holiday gifts or just a sweet treat for a special someone.
If you missed our previous posts on how to craft with Springerle molds, see them here: Casting and Papercasting. As a quick review, Springerle cookies have been used to depict everything from biblical images to daily life since the 16th century. While the molds were originally used to make dense, cake-like cookies (see our recipe here!), they have advanced to be useful in crafting as well.
Our molds are made by House on the Hill of an heirloom quality wood and composite mix. Most of their images are casts of vintage molds and others are of their own design.
Before making our toppers for this tutorial, we pre-made cookies using our Gingerbread recipe. This recipe is fabulous for not only its taste, but for holding its shape. You could also use our No-Fail Sugar Cookie Recipe. We took note of the sizes of our molds and used cutters to make cookies just slightly larger.
We also pre-made our modeling chocolate, which is a surprisingly simple recipe from House on the Hill. You can also buy chocolate-flavored, white or colored fondant at most craft and baking stores. Or if you prefer to make your own, here’s a recipe from Allrecipes! And for you sweet almond lovers, you can simply use Marzipan from your grocery store.
I will show images using both the modeling chocolate (in brown) and fondant (in white). If you choose to use marzipan, you will follow the fondant instructions.
Ingredients/ Utensils
- Modeling chocolate, fondant or marzipan
- Cocoa powder (if using modeling chocolate)
- Powdered sugar (if using fondant or marzipan)
- Corn Syrup
- Springerle mold
- Cookies cut and baked in the shape of your mold
- 2 Pastry brushes
- Spatula
- Small dish (for cocoa powder or powdered sugar)
- Cooling rack (if using modeling chocolate)
- Pastry prep mat (optional)
- Luster or disco dust (optional)
- Small food-safe paint brush (optional)
Directions
1. Workspace prep: On a flat surface, lay down your Pastry Prep Mat or wax paper to protect your surface and keep your area clean. Fill a small dish with your dusting powder (either cocoa or powdered sugar) and set near your pastry mat with a clean, dry pastry brush. Set your modeling chocolate, fondant or marzipan in a bowl near your space for easy access. Set out your cooling racks if using modeling chocolate.

2. Dip your pastry brush in cocoa (for chocolate) or powdered sugar (for fondant or marzipan) and dust your Springerle mold so it has an thick, even coating throughout the design. The pastry brush is great for this as it won’t clog up the deeper areas.


3. Lay your dusted mold face up on your pastry mat. Pull a ball of your topper medium from the bowl. It will need to be enough to fill the mold and a little extra to go over the edges.
Fancy tip: Your modeling chocolate should be the consistency of Play-Doh or perhaps even a touch harder. If it seems too soft or is sticking in your mold, flatten the ball into a pancake and refrigerate for 5-10 minutes.

4. Using your hands, press your medium into the mold. Be sure to push firmly to fill the deeper parts of the design.


5. When you feel the mold is adequately filled, flatten the back of your medium with a spatula. Press the topping to be quite thin unless you love a lot of chocolate or fondant on your cookies. 🙂
Fancy tip: If your spatula is sticking to your chocolate or fondant, dust with cocoa or powdered sugar, respectively.


6. Turn your Springerle mold upside down with your medium still in it. Use gravity (and some light taps on the table) to release it. Release time may be longer for deeper molds.


7. Trim any extra with a knife or spatula and return to your bowl for re-use. You could also use a cookie cutter sized to your mold (we have many available here).

8. For modeling chocolate only: Set your finished topper on a cooling rack to dry until firm (approximately 2 hours). You can make these ahead of time and keep in an airtight container at room temperature for up to 1 month.

9. Repeat steps 2-8 for as many toppers as you need. Be sure to dust the mold before every press for all options.

10. To adhere the toppers to your cookies, brush a thin layer of corn syrup on the back of your topper and set on your cookie. Let dry for at least 10 minutes.


11. For a fancy touch, “paint” your topper with luster dust. You will not need to mix the luster dust with anything for this project. It should stick directly onto your medium. We used Super Green and Old Gold. See all our Luster and Disco Dust colors here!

Display in a cute container for decoration or wrap in a simple polypropylene bag with a ribbon to hand out to friends and family. To create the snow effect on our Pinewood Cabin cookie, I dusted it with powdered sugar instead of the cocoa.
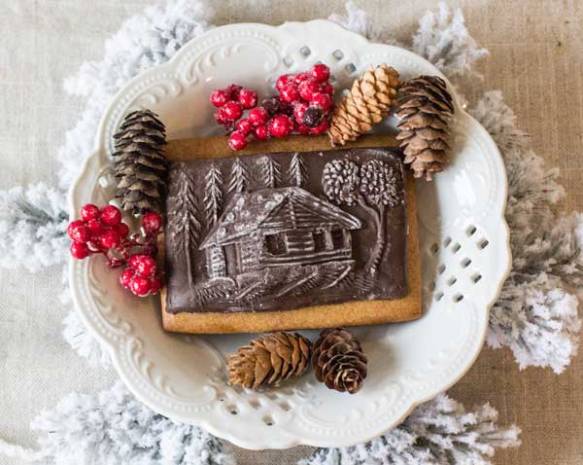
Molds shown in this tutorial are Tree on Table, Monogram F, Pinewood Cabin and Snowman.

We would love to see your projects. What did you make your toppers for? Show us in the comments or send an email to info@fancyflours.com!

